Lighting is a huge factor in basketball, affecting both players and spectators. Over time, even the best fixtures—whether LEDs, metal halides, or fluorescent systems—begin to show signs of wear. Knowing when and why to replace them helps keep the court safe, bright, and enjoyable for everyone.
One of the most common reasons courts need new lighting is dimming. LEDs slowly lose brightness after 30,000–50,000 hours of use. That might sound like a lot, but if a gym runs its lights three hours a day, 5–6 days a week, the total adds up to around 500–1,000 hours per year, meaning you could see noticeable dimming in 10–15 years.
Metal halide lamps dim much faster. Even high-quality 400–1000 watt metal halides can lose 20–30% of their brightness after 10–15,000 hours, which often translates to just 3–5 years of regular use. Dim lighting doesn’t just make the floor look dull—it affects player performance, depth perception, and shooting accuracy, especially during evening games or in gyms with glossy floors that reflect light unevenly.
Dimming also affects uniformity, the even spread of light across the court. If one corner is noticeably darker than the rest, players may misjudge passes or struggle with long-range shots. Courts with uneven lighting often see more fouls or turnovers simply because players can’t track the ball properly.
Flickering is another reason to replace court lights. In LEDs, flickering usually comes from failing drivers or incompatible dimmers, while in metal halides, it often comes from ballast degradation or voltage fluctuations.
Flickering isn’t just a visual nuisance—it can cause eye strain, headaches, and even nausea during long practice sessions. For fast-paced basketball, even a fraction-of-a-second flicker can disrupt timing, making it harder for players to react to passes, rebounds, or free throws. Imagine a player going for a jump shot while a flickering light distracts their depth perception; mistakes and injuries can happen more easily.
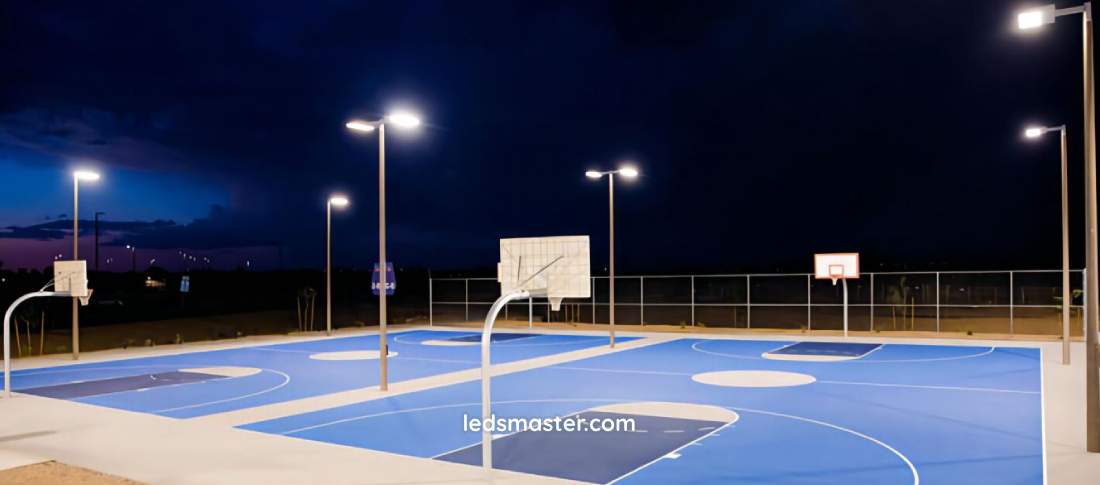
Sometimes the need for replacement is more about safety than brightness. Older fixtures may develop corroded housings, cracked lenses, or loose mounting brackets. Outdoor poles exposed to rain, snow, and wind are especially vulnerable. A fixture falling from a height of 8–12 meters could cause serious injury, not to mention damage to the court or equipment.
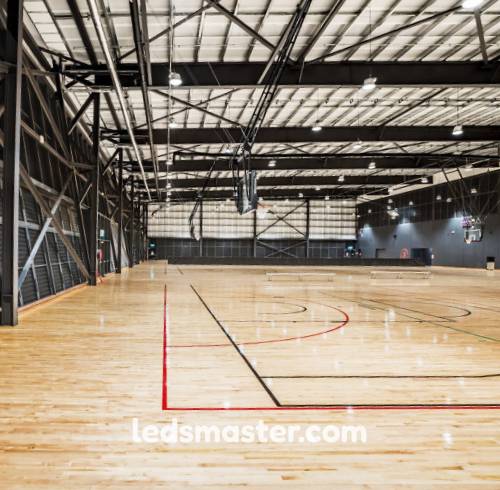
Even indoor lights aren’t immune. Ceilings and support structures can degrade, particularly in older gyms, making it riskier to leave aging fixtures in place. By replacing them with new LED floodlights or retrofit kits, facilities reduce the chance of accidents and avoid costly emergency repairs.
Another hidden factor is maintenance. Continuously replacing individual metal halide bulbs can be labor-intensive and expensive, often requiring lifts or scaffolding for ceiling-mounted lights. A school gym with 20–24 fixtures might spend $1,000–$2,000 per year just on replacement bulbs and labor.
Switching to newer LEDs can reduce both maintenance frequency and cost. With lifespans of 50,000–100,000 hours, LEDs can last 20–30 years in typical usage, dramatically lowering annual upkeep. Even a mid-sized indoor court can save thousands over a decade by swapping old metal halides for modern LED systems.
Finally, replacing lights keeps the court game-ready and professional-looking. Modern LEDs offer higher uniformity ratios, adjustable color temperatures (4000–5000K for indoors, 5000–6000K for outdoors), and glare reduction features. This improves ball tracking, depth perception, and shooting accuracy, especially for younger players or leagues with fast-paced games. Spectators also benefit, as brighter, evenly lit courts make it easier to follow the action from the stands or in video coverage.
Replacing basketball court lights isn’t just a quick swap of bulbs. It takes planning, attention to detail, and a clear understanding of fixtures, wattage, mounting options, and electrical requirements. Doing it right ensures consistent brightness, reduces maintenance, and keeps players safe.
Many gyms and older outdoor courts still rely on metal halide lamps, which are high-intensity discharge (HID) fixtures. Replacing them with LEDs not only improves lighting quality but also cuts energy use by 60–70% immediately.
The first step is identifying the wattage equivalent. For example, a 400W metal halide typically requires only a 150–200W LED to produce the same lux levels on the court. Similarly, a 1000W metal halide for a larger professional arena might be replaced with a 400–500W LED fixture. This wattage reduction lowers electricity bills while maintaining bright, even illumination.
Next, consider mounting options and brackets. Indoor courts usually have ceiling-mounted fixtures with adjustable beams, while outdoor courts rely on pole-mounted lights. Some LED fixtures are heavier than their metal halide predecessors, so it’s vital to ensure that brackets, poles, and fasteners can safely handle the load. Heights matter too: indoor ceilings are usually 7–12 meters, while outdoor poles range from 8–15 meters to reduce shadows and achieve uniform coverage across the playing surface.
It’s tempting to just match wattage when swapping lights, but that’s not enough. Different technologies produce different amounts of light per watt, so a direct wattage comparison can be misleading.
The focus should be on lux or foot-candle output, which measures the actual illuminance on the court. For example, a 150W LED might produce the same 500–1000 lux that a 400W metal halide did, but if the lux requirements for the court size aren’t calculated correctly, you could end up with dark corners or overly bright hotspots.
Using photometric data from manufacturers helps ensure even coverage. Some facilities even use lighting simulation software to visualize how light spreads across the court before installation. This prevents costly mistakes and ensures uniformity ratios stay above 0.7, which is usually recommended for basketball courts.
Older gyms often have wiring designed for HID lamps, which operate differently from LEDs. Many LEDs require drivers or separate circuits to function properly. It’s important to check voltage and current ratings, confirm dimming compatibility, and ensure the existing circuit can handle the load.
Installing a few test fixtures before replacing the entire court is a smart move. This allows you to verify brightness, uniformity, glare levels, and electrical compatibility without committing to a full installation. It’s also easier to adjust fixture angles or replace drivers on a small scale rather than after the entire system is mounted.
When planning a lighting replacement, consider fixture spacing and beam angles. LEDs often have asymmetric lenses that direct more light toward key areas, such as the three-point line or the basket, while reducing spill into spectator areas. Cleaning and inspecting poles, brackets, and wiring before installation can prevent future maintenance headaches.
Another tip is to check color temperature, which affects player comfort and visibility. Indoor courts usually benefit from 4000–5000K neutral white, while outdoor courts often use 5000–6000K to mimic daylight conditions. Selecting the correct color temperature can make the court feel brighter and improve ball tracking for fast-moving play.
 Even seasoned facilities managers can run into issues when replacing basketball court lights. Knowing the most frequent mistakes can save time, money, and headaches while keeping players safe and the court well-lit.
One of the most frequent missteps is focusing on wattage instead of actual brightness. People often pick a replacement LED that matches the old metal halide’s wattage rather than the lux or foot-candle output needed for the court.
This can result in dim corners, uneven illumination, or hotspots near baskets. For example, a 400W metal halide replaced by a 200W LED might work if the fixture’s lumen output is equivalent, but without checking the lux requirement for the 28 by 15 meter indoor court, some areas could still fall below the recommended 500–1000 lux. Players may notice these variations immediately, and for evening or televised games, inconsistent lighting can affect both depth perception and camera quality.
Another common issue is neglecting the power supply and driver compatibility. LEDs require specific drivers or ballasts, and installing them on an incompatible circuit can cause flickering, reduced lifespan, or even fixture failure.
Older gyms with metal halides often have ballasts rated for high-wattage HID lamps. Simply swapping in an LED without checking voltage, current, and dimming compatibility is a recipe for problems. Installing a few test fixtures first can reveal whether the circuit can handle the load, preventing costly mistakes across a full court.
Mounting errors happen more often than many realize. Using brackets, poles, or supports rated for lighter fixtures can create safety hazards, especially in outdoor courts where wind and weather put extra stress on poles.
Improper aiming is another issue. LEDs with incorrect tilt angles or beam spreads can produce glare for players, uneven coverage, or light spill into nearby homes. Following manufacturer specifications for fixture height, spacing, and aiming angles ensures uniform light distribution and reduces complaints. For indoor courts, incorrect angles can also cause reflections on glossy floors or backboards, which distract players and interfere with video recording.
Even LEDs need occasional care. Dust, cobwebs, or dirt on lenses can reduce brightness by 10–20%, undermining the performance of newly installed fixtures. Scheduling routine inspections and cleaning helps maintain uniform lux levels and prolongs fixture life. Neglecting this simple step can lead to uneven lighting or unnecessary early replacement, especially in gyms or outdoor courts exposed to heavy dust or pollen.
Sometimes replacing the lights with the same type isn’t the smartest move. Upgrading from metal halide to LED can cut energy consumption by 60–70% and reduce maintenance needs.
For example, a 20-fixture indoor court using 300W LEDs for three hours a day costs roughly $1,000 per year in electricity, compared to $3,000+ for equivalent metal halide fixtures. Over a decade, that’s a savings of $20,000 or more just on energy.
Upgrading also improves uniformity, color temperature, and glare control, creating a court that feels brighter, safer, and more professional without touching the floor or hoops. Players often notice the difference immediately: ball tracking is easier, reactions feel faster, and eye strain is reduced, which enhances both practice and game performance.
Plan the replacement in phases if possible. Start with one section to test fixture placement and electrical compatibility. Take photometric readings to confirm uniformity and brightness. Make sure all brackets, mounts, and fasteners are rated for the new fixture weight. And don’t forget routine maintenance—cleaning lenses, checking mounts, and inspecting drivers will extend the life of the new lights.