How to Install Flood Lights?
Installing a flood light might seen a bit intricate at first, but with little technical insight, LED flood lights are pretty easy to install. Let’s learn how to install flood lights together! To be able to use the floodlight properly, one must first understand different parts. Figure below shows the standard parts of an LED flood light.
Parts of an LED Flood Light
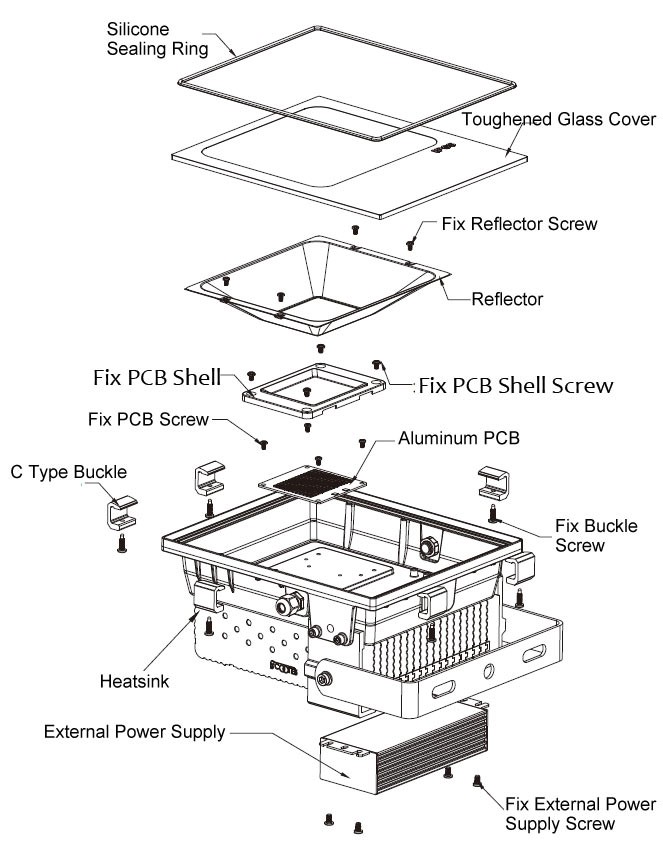
Although different manufacturers use different parts, but understanding the parts shown above will help in understanding any other type of light. Silicon seal ring is used to prevent ingress of moisture, rain or dirt from outside into the LED housing. Following this seal ring is a crystal clear tough glass cover, which is made tough enough to withstand changes in temperatures, high winds and low power blows/strikes. Then comes a shiny reflector piece, this cover all sides of the LED chip or the Aluminum PCB, such that, no stray light comes out of the flood light fixture, and all of the light generated is focused on the target area. The reflector is screwed in the housing, with the help of four screws on its side. At first the LED chip or the aluminum PCB is screwed on the housing with four screws, followed by the PCB shell, that acts as a coupling between the reflector and the LED chip. The PCB shell is also screwed in the housing, above which comes the reflector, glass and the sealing silicone ring.
Ones these are installed within the housing, C-type buckles are placed on the sides and tightened with screws to ensure a dust tight sealing of housing. Usually six to eight, of these C-type buckles are used. At the back of the housing is a heat sink. Although LED lights, generate significantly less heat when compared to traditional alternates, but still a heat sink is installed to avoid overheating of the LED aluminum PCB. A power supply may be used for some LED light fixtures, whereas, others don’t require it. This power supply is also mounted on the housing with the help of screws.
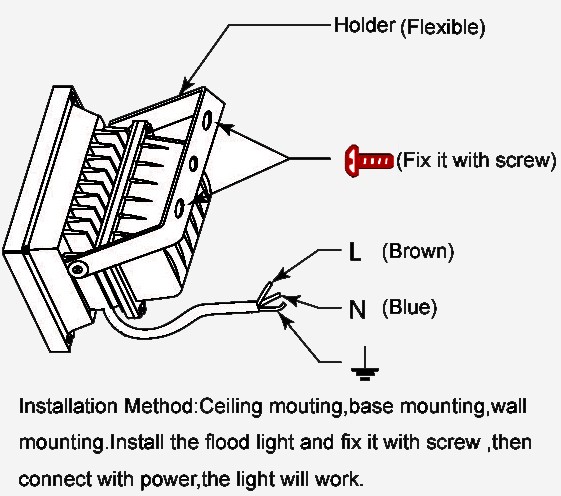
A flexible holder is installed on the housing through which the flood light is affixed on a rigid body. Lastly an electrical wire comes out of the flood light through a compression fitting with three cores, one of which is live, second is neutral and third is earth.
How to Install Flood Lights?
Now the first thing is to identify the location where it is to be installed. Usually these are at a height, unless a wall wash application is required. A ladder, drill machine, screws and spirit level will be required to install it. First, only the flexible holder shall be taken up on the ladder and installed on the wall through proper marking and leveling. Once it is installed an electrical conduit or pipe shall be installed, leading up to the light from nearest proper electrical connection. The LED flood light should then be installed on the flexible holder and screws shall be tightened as per required direction. Finally, electrical connections should be made and properly secured within the conduit, such that, no rain water can enter the connection. There you go, turn on the light and enjoy a BBQ night in your backyard.
Contact email: beatus@ledsmaster.com